
get headlines https://thecherrycreeknews.com
Instagram photos look best at 1080 pixels wide. Pinterest images shine at around 1000×1500 pixels. A Facebook photo should be at least 1200 pixels wide—1920 if it’s an event photo. In 2003, when 500px launched, the perfect web-resolution was, well, 500 pixels. Now, it’s best to upload your photos with a resolution of at least 2048 pixels.
The web is constantly evolving, and for photographers, that means regular image resizing. While you can resize your photos using a variety of quick online tools, we recommend doing it with care and precision so you don’t damage the quality of your files. Here are our tips for resizing your images without losing any details in the process.
First, it’s important to understand the terms that will be used in this article.
The dimension of a photo is essentially the measurement of its length and width. Depending on what you’re using your photo for, you may need to see this measurement in pixels, inches, or centimeters. There are many standard sets of dimensions that you’re probably familiar with; for example, your old family photo albums are probably full of standard 4×6 inch prints.
The resolution of a photo refers to how many pixels there are within those dimensions. (Therefore, the pixel density of the photo.) The smaller those pixels, the more of them you can fit within your dimensions and, in most cases, the sharper your image will appear.
DPI (Dots Per Inch) and PPI (Pixels Per Inch) are the two terms that describe your image resolution. Although you may hear them used interchangeably, DPI refers to print resolution (as in, the number of ink dots per inch) while PPI refers to screen resolution (or how many pixels in an inch when your photo is viewed at 100%).
File size refers to how much space or memory your photo takes up. The more information there is in an image, the more memory it requires, and the bigger the file size. “Information” can refer to pixels, which means a higher resolution may give you a larger file, or it can refer to things like layers if you are saving in a non-destructive file type.
Aspect ratio is often confused with dimension because they’re closely related. Your dimension, as we just discussed, describes the length and width of your image in terms of measurements. Your aspect ratio describes that length and width in terms of—you guessed it—a ratio. Those 4×6 inch family photos we just talked about have an aspect ratio of 3:2.
Resizing is a daily part of a professional photographer’s workflow. Even if you are not going to print your image, your website or online portfolio will probably have requirements for the file size and resolution that an image must be in order to be uploaded. Depending on where your image will appear, you may want to use a specific aspect ratio (a hero image will require a different aspect ratio than an Instagram post).
If you do not resize to fit those requirements, the hosting site may refuse to upload it altogether, or worse, compress or distort your photo. The process of resizing the dimensions of a photo and/or changing its resolution and file size to prepare it for the web is called image optimization.
Resizing in Photoshop is a relatively simple process. Start by going to Image > Image Size.
Here you’ll see all that vocab we just covered. Your file size (Image Size) is right there at the top. Below it are your dimensions.
If you want to convert pixels to inches or need to do the opposite and convert inches to pixels, simply select a new unit of measurement from one of the dropdown menus on the right. Last is the image resolution, which is measured in PPI or DPI. In theory, you can just set these numbers however you like and click “OK.” In practice, it’s not always that easy.
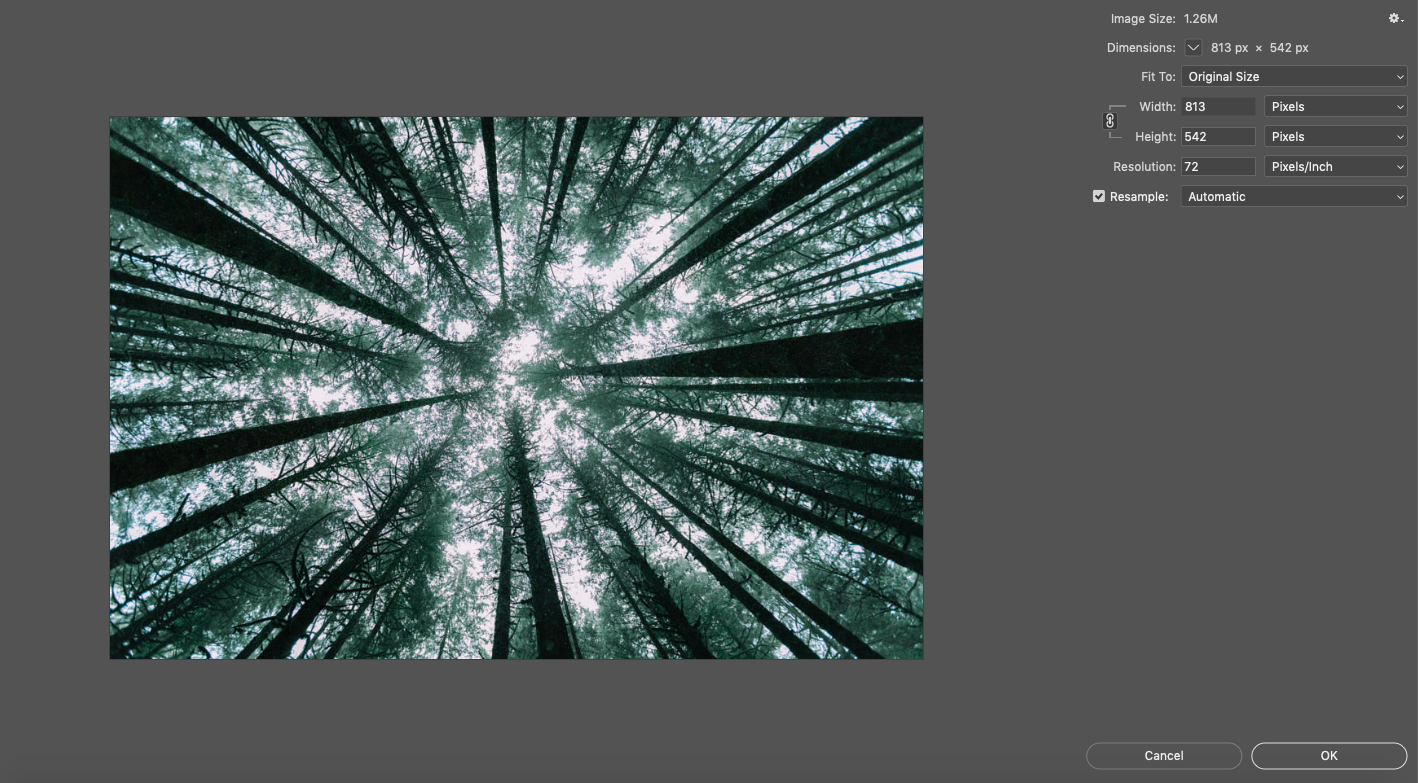
Above, we’re resizing Forest Sky, a piece by 500px Contributor Kalen Emsley, as an example. You can see the “Image Size” dialogue box we just described.
Say you want to increase the resolution, so you type a new number into the resolution box.
Notice what happens below.
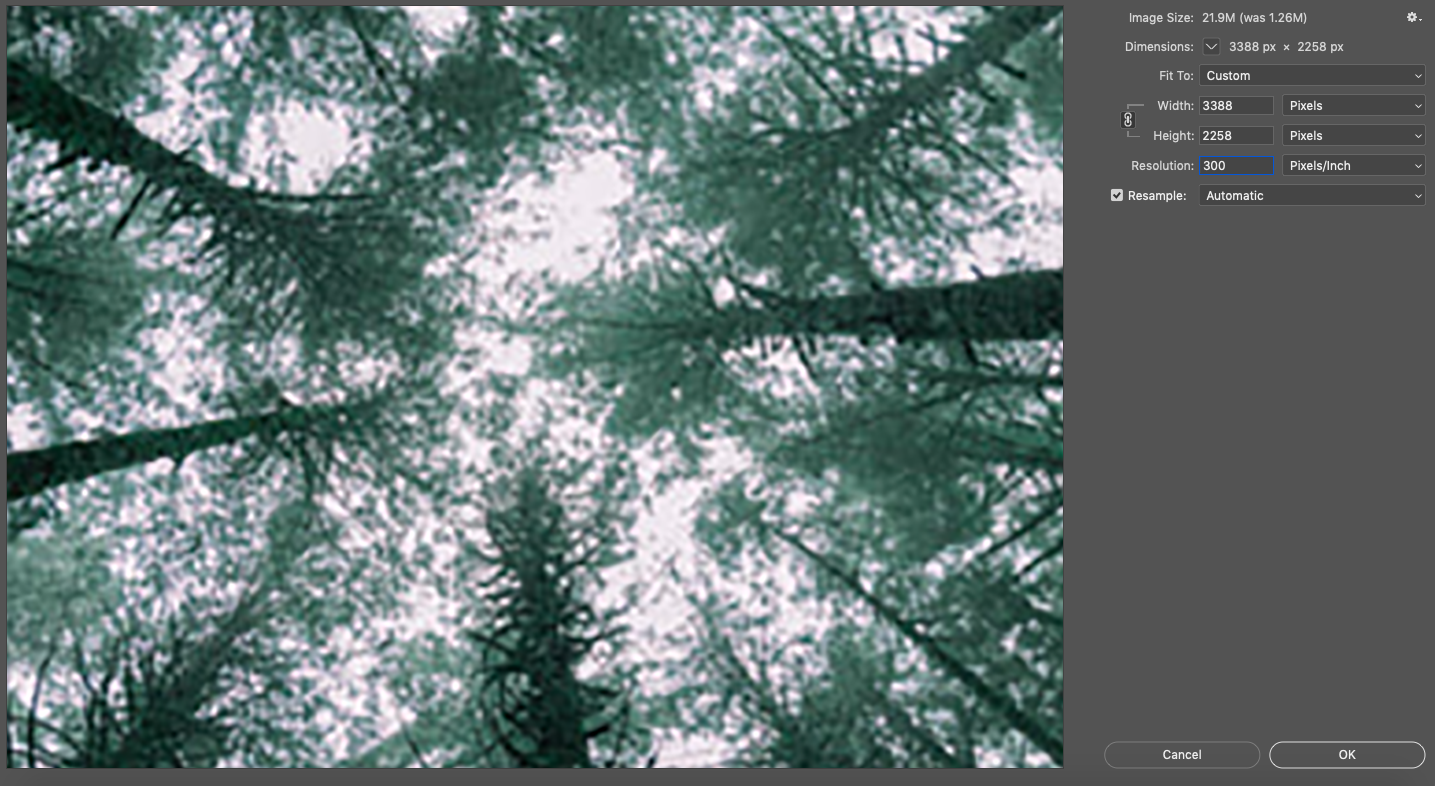
Not only has your resolution increased in the image above, but your dimensions have also increased as well. You haven’t actually increased the resolution; you’ve just expanded those pixels out. Imagine you have a stretchy polka-dot shirt. If you lay it flat, the dots are close together. If you stretch it, those dots get farther apart as the edges of the shirt extend further out. That’s how it works with pixels and resizing.
Because the resample button is checked in our dialogue box (it will usually be this way by default), Photoshop filled in those pixel gaps for us. But because your computer does not have the actual scene to compare your image to, it can only make an educated guess at what the new pixels should look like. When you resize without resampling, Photoshop will not fill those gaps; it will simply change the resolution to match your resizing.
That’s how issues like fuzziness occur when you enlarge what was originally a razor-sharp photo and because of that, it’s easier to retain good quality when you’re making an image smaller than when you are making it bigger. However, when you make an image smaller, you may be inadvertently deleting some of that pixel information, which means you might still experience a loss of quality if you try to size back up again.
In the case of this particular photo, the loss of image quality would barely be noticeable since it had a healthy number of pixels to start with. You may find yourself in a position where you have to make changes like this in order to meet an upload or printing requirement with an image, so do two things to keep image degradation from becoming noticeable to the naked eye:
1. Shoot at a high resolution
This way, you give yourself plenty of information to work with in case you ever have to “fudge” the numbers on your resolution in post-processing.
2. Keep a copy of your original
If you ever make a change and later discover that the quality doesn’t hold up the way it appeared to on your editing screen, you can go back to the drawing board with your original pixel density.
When you are determining how to size your image, start with the dimensions. The first step is to use the correct unit of measurement. If you will be printing your photo, measure in inches or centimeters. This will be especially helpful if you want to mat and/or frame it, as you can simply choose a standard size like 5×7, 8×10, or 11×14 and go from there.
Remember that different standard sizes have different aspect ratios. So if your image has an aspect ratio of 3:2 (remember, that’s a 4×6 inch photo), you will experience some cropping if you resize it to an 8×10, which has an aspect ratio of 5:4.
After your in-camera focus settings, your resolution is what ultimately determines the sharpness of your image. The standard for web-based images is 72 PPI (or DPI, depending on who you speak with about it), although many photographers choose to go with 300, which is the standard for a high-resolution print image.
Now that you’ve learned what to do in Photoshop to resize your images, and how to do it without sacrificing quality, you can easily resize your photography for use on the web or in print. Remember to use the correct resolution for your medium and shoot at a high resolution to allow yourself plenty of flexibility when you are ready to resize.
Not on 500px yet? Sign up here to explore more impactful photography.
The post Pixels to Inches: How to Resize Images Without Losing Quality in Photoshop appeared first on 500px.
Colorado NewsHow to make money with photography is a common question we get within our community. We’ve pulled together the Top 10 insights from our 500px Content Team on how to make money with photography.
If you’re interested in licensing your photos with 500px and selling them through our distribution partners, these tips will tell you everything you need to know to get started.
Keywording is a theme that usually comes up when advising photographers on how to improve the discoverability of images for buyers.
The main points to keep in mind are:
-Without keywords, nobody will find your work.
-Use at least five keywords for your photos, but the sweet spot is between 15 and 20.
-Make your keywords relevant—irrelevant keywords will dilute your image.
-Do your research. See what photos come up for different keywords. If you were a buyer who wanted your image, what would you be searching for?
-Incorporate both conceptual and literal keywords.
-Include location details in your keywords.
-Include details about any people in the photo, including age, gender, ethnicity, etc.

Make sure to always include the location information when submitting photos for Licensing. This helps buyers find the photo they are looking for and makes it clear what destination or place is in the photo.

One of the issues the Content Team runs into time-after-time is users forgetting to confirm their contact information and not completing their payout setup. As a photographer contributing to Licensing, you are required to submit your primary phone number and email address. If you make a sale through one of our distribution partners, providing and completing this information is crucial to requesting payment.
Update your contact information and complete your payout setup, so you’re easy to reach when the time comes.

The quality of your images is important, but it is also a good idea to upload batches of photos every week, or every other week. Trends are constantly changing, and buyers are always looking for fresh content. Your Licensing portfolio should reflect changing trends and should not be seen as static. We understand that photographers want to test the waters with a couple of images before they submit more content to Licensing, but this may not be the right approach, as the more images you have on your portfolio, the more chances you have to make a sale.
Keeping an eye out on our trend related blog posts and staying on top of different articles that are shared in our Contributor Newsletter is key. Also, remember to keep an eye on different galleries and the different Licensing Quests that are available to find out what type of content is selling.
Our Content Team at 500px is always advising Licensing Contributors to do their research and keep up with advertising trends and what’s selling on Getty Images.
Pay attention to the kind of images you see in different types of ads, billboards, and posters. Analyze how these images are used and how they are composed. Think about a way to replicate and adapt what you see to your photography.
Stand out, get noticed, get sales—easier said than done, but crucial, nonetheless.
We will, so you might as well do it first. Zoom in to 100% and make sure you’ve got a sharp photo that is free from the issues that only really become obvious when you get close, such as dust spots or noise. You don’t know how large the buyer wants to blow your photo up, but you want to make sure they can go as big as the file’s resolution allows.
When inspecting your images, look for:
-Chromatic aberration
-Dust spots
-Tiny logos
-Digital noise

Exclusivity has many different advantages. Not only will the photographer earn a royalty of 60% of every license purchased, instead of 30% with non-exclusive photos, but they are usually featured more on the 500px website.
Buyers want real photos.
The stock photography of today depicts real and diverse moments and people, creating authentic and relatable content. These photos are not posed or staged. Consider the moments you encounter in your day-to-day. What does diversity mean to you? Shoot that.
If you’re already taking real and diverse photos on your travels or in your everyday life with your friends or clients, make sure you keep model releases handy so that you can license those photos later on. For added convenience, especially when traveling, you can always download a model release app like Easy Release, Model Release Pro, or Model Release X.
When you submit a photo to 500px for Licensing, make sure you’re submitting a photo that is at least 3000px on the longest side and does not have any watermarks or logos. Also, make sure there are no dust spots or other technical issues, and go easy on the HDR. A good tip is to always keep an eye on your histogram to make sure things are looking good.

Royalty-free means a buyer pays a larger, one-time fee to use your photo multiple times on multiple types of media. That way, they can use it in multiple campaigns without coming back and re-licensing it every single time.
Not on 500px yet? Click here to learn about Licensing with 500px.
The post How to make money with photography: Top 10 insights from the 500px Content Team appeared first on 500px.
Colorado News


