
more news https://northdenvernews.com
Henri Cartier-Bresson did it. Edward Steichen and Richard Avedon did too. Ansel Adams recently went viral for using it. Of course, we’re talking about the golden ratio, the divine proportion, or phi—a seemingly magical number that crops up time and again in the work of master photographers. Whether they used it intentionally or not, the ratio has become a defining principle in the art and history of the medium.
Here’s a brief refresher from math class: two numbers or objects are in the golden ratio if their ratio is equal to the ratio of their sum to the largest number. Numbers in the famous Fibonacci Sequence (0, 1, 1, 2, 3, 5, 8, 13, 21, 34, etc.) come close to the golden ratio, becoming even closer as they progress.
The golden ratio can be represented by the number phi, or approximately 1.618. You can find this number throughout the human face and body as well as in nature, from plants to celestial objects. Many say the ratio is inherently pleasing to the human eye, and some say it’s simply the result of our desire to find meaning and patterns in our surroundings, but the fact remains that it’s been used in art for centuries.

Architects like Le Corbusier and painters like Salvador Dalí incorporated the number into their masterpieces, and it’s been applied by scholars to countless works of art and design, ranging from Botticelli to Michelangelo, sometimes retrospectively. For photographers, of course, it’s become one of many tricks for creating asymmetrical balance within a single frame.

Sometimes, the golden ratio is shifted slightly to become the rule of thirds, though many feel that the latter is an oversimplification. With the rule of thirds, you’ll divide your rectangular frame equally like a tic-tac-toe board (1:1:1 vertically and 1:1:1 horizontally); instead, you might choose to divide it according to the golden ratio: 1:0.618:1. It’s up to you, but many believe that the second comes closer to achieving that perfect harmonious balance.
Luckily, you can easily apply a golden ratio overlay to any photo in Photoshop or a similar editing app. In that case, your subject or point of interest would fall a bit further inside those thirds lines, and you might also place your horizon along one of those lines.
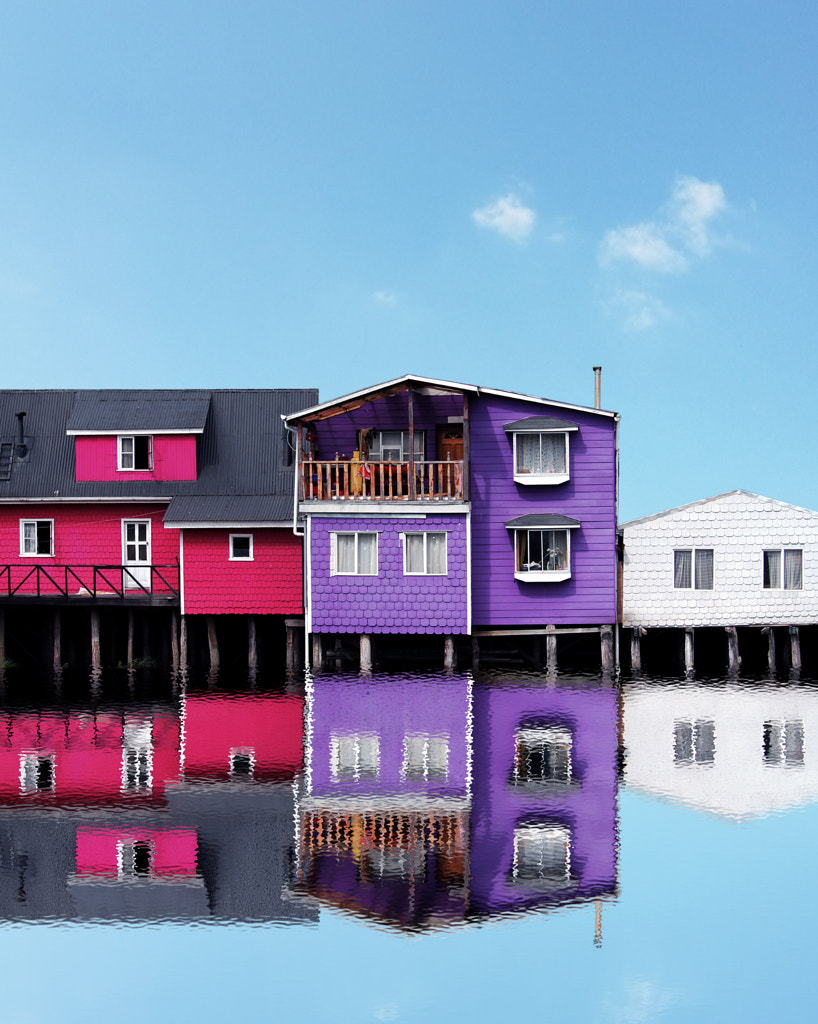
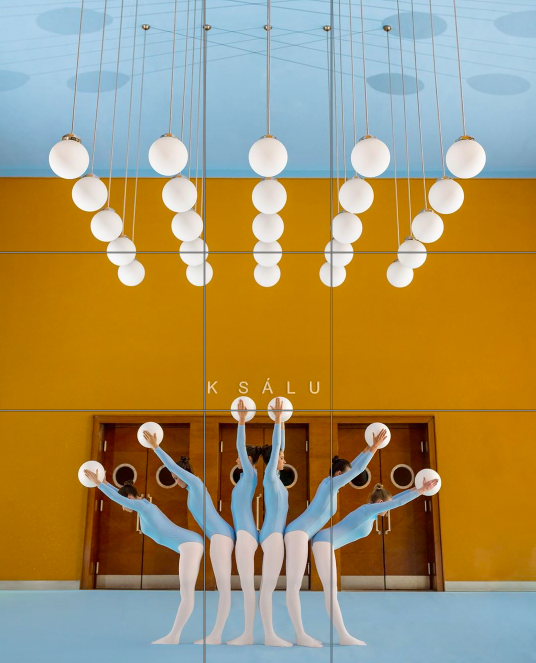
This photo by Milos Nejezchleb, for instance, applies the principle to direct the eye to the hands of the women as well as the edges of the door frames, light fixtures, and signage (see a close-up with Photoshop grid lines below); you’ll find that many images in his portfolio use the golden ratio to similar effect.
You might have heard, too, about the golden rectangle, or a rectangle whose sides are in the golden ratio. In geometry, you probably studied the golden spiral—a logarithmic spiral with a growth factor equal to phi—as well. The nautilus shell is famous for following this spiral, and many photographic compositions might also adhere to the curve of the golden or Fibonacci spiral.
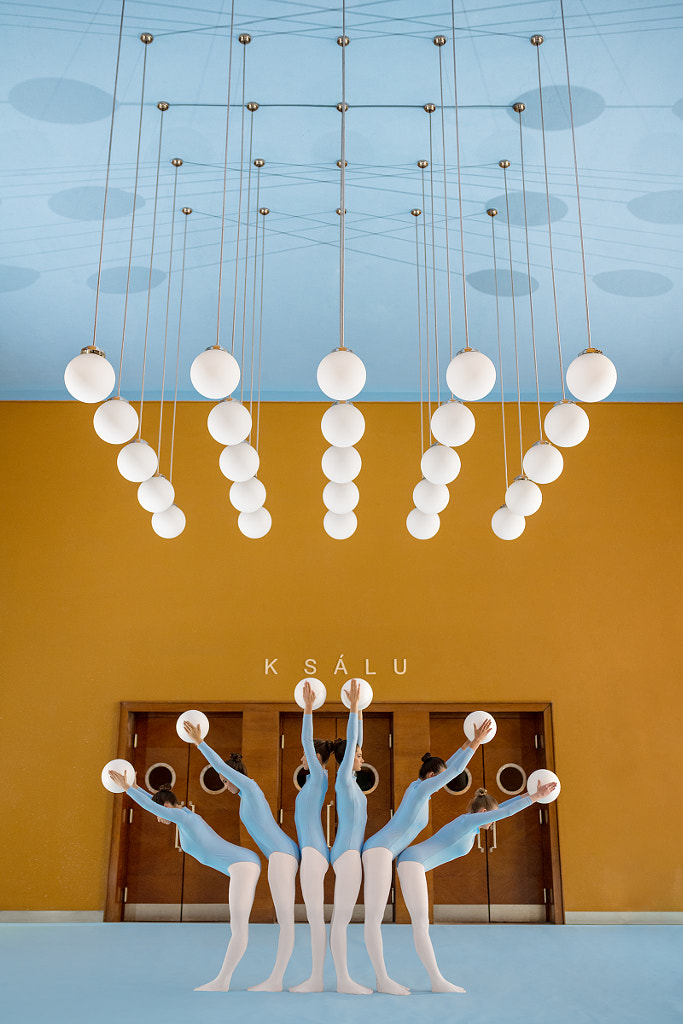
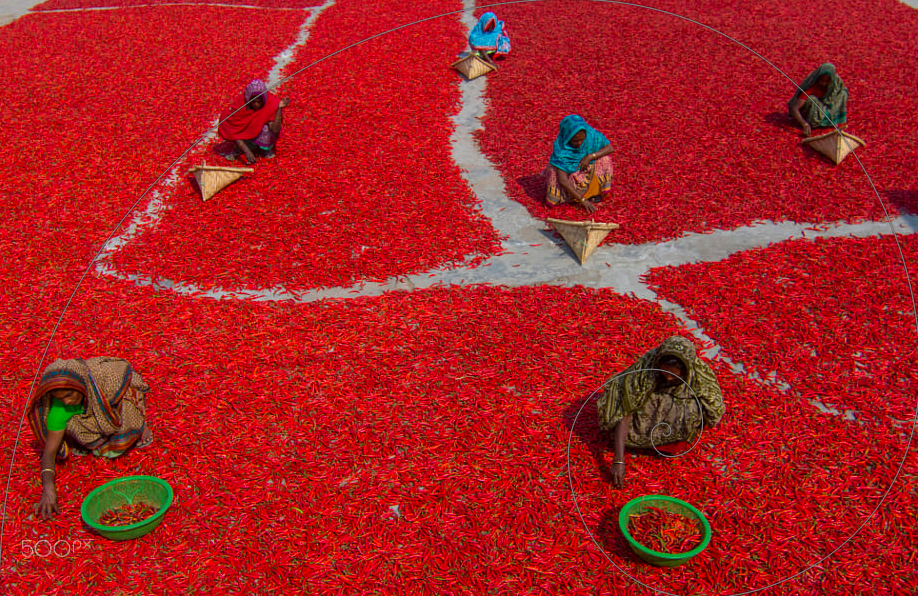
This photo by Azim Khan Ronnie, for example, positions various women along the Fibonacci spiral to guide our eye to the main subject—the woman in the foreground—who occupies the tightest coil of the spiral. Every figure is essential, forming a visual map that serves to bring the “hero” into greater focus.
Of course, these are just two ways of using the golden ratio to compose your images, but possibilities abound. When you’re in the field, practice keeping that spiral or phi grid in the back of your mind. The more you use it, the better you’ll get at composing your shots in the moment, rather than having to finesse your compositions on the computer.
You won’t be able to follow the golden ratio using an overlay in your viewfinder, as you would the rule of thirds, simply because all the variations would make it too confusing, but this can actually be an asset rather than an obstacle because you’re forced to visualize it on your own.
Bending down, climbing stairs, and moving to the right or left are all ways to exert control over what’s in your frame and what isn’t; if you’re working with moving subjects, it can also pay to wait until someone enters just the right portion of that rectangle. You can always capture a few shots of the same subject to see what comes closest to aligning with the spiral or grid.
It can also help to consume as many images as possible, training your eye by studying photos that work. Cartier-Bresson himself regularly studied paintings to deepen his understanding of geometry. Throughout this article, you’ll find examples of compositions that follow the phi grid or the Fibonacci spiral.

When used correctly, as we see here, the golden ratio can bring your photos to life. But as with any photography guideline, it isn’t necessarily a rule; it’s just a tool. Some photographers swear by the divine proportion, while others think it’s overhyped. The truth—like the ratio—is more complex: it works in many situations, but it might not work every time.
The curves of the human face, for instance, naturally lend themselves to this compositional technique, as do works of architecture, but it’s ultimately up to you where to place the eyes, the horizon line, and other essential details. Follow the ratio when you want to convey a sense of harmony and balance, but don’t be afraid to mix it up and try new things as well.

The golden ratio has, in one way or another, informed artworks for centuries—and inspired best-selling novels—and we’re still learning more about it. Last year, for instance, researchers at Johns Hopkins University found that beyond the well-known examples of pinecones, galaxies, and hurricanes, the number could be found in the dimensions of the human skull. While we might not yet understand everything about it, this number seems to be baked into our anatomy, so it makes sense that we seek it out in art, consciously or not.
Not on 500px yet? Sign up here to explore more impactful photography.
The post How to use the golden ratio in your photography: A beginner’s guide appeared first on 500px.
Colorado NewsThis article is guide for the aspiring travel photographer who don’t know where to start. The article originally appeared here, and is being republished with express permission from Viktor.
Viktor Elizarov is a travel photographer and educator from Montreal, Canada. He travels around the world and shares his experiences on his popular travel photography blog. Visit Tutorials section of his blog for free tutorials (including original raw files) and free Lightroom presets.

It was a beautiful day in Montreal. I was on a regular afternoon jog listening to a popular photography podcast. The topic of the episode was travel photography. The guests on the show were two professional photographers with the years of experience.
At the end of the podcast, during the listener question and answer session, the first question immediately grabbed my attention. Why? Because I’ve been asked the same, or a nearly identical, question many times before.
So what’s the question?
I want to start traveling more specifically for photography, but I do not know where to start. Do you have any idea where I should go or how to plan my trip? Should I edit photos while I am there or should I wait until I return home? What cameras, lenses and other equipment do I take? Help! I am suffering from analysis paralysis.
Ok, so perhaps the question has multiple parts but it still rang true to my experience. I was curious to hear the answers because I knew it was a loaded question and definitely not an easy one.
The pro photographers’ answers surprised me.
Here are some of them:
“South Asia is a good place to go.”
“Do not go to Bangkok.”
“If you do not know, choose a place randomly.”
“Europe, maybe.”
Instead of addressing the complex subject of travel photography, the photographers only concentrated on a single aspect: the location. Their answers disappointed me because I do not consider the location to be the essential part of travel photography. You do not need to travel to a remote and exotic destination to enjoy travel photography.
So I’ve decided to put together a blueprint or guide to help people who want to get involved in travel photography, but do not know where to start. I used a similar approach when I first started and it has proven successful over the years.
First and foremost, please do not start your travel photography journey with a trip to South Asia. It will be a waste of time and money, not to mention it will be full of disappointments.
Start smaller and grow from there.

Find a local park in your neighborhood, preferably within walking distance or a short drive. Make this your testing ground for your equipment and photography routines.
Any urban park has all the essential elements of travel photography: landscapes, cityscapes, people, etc…
Plan your visits during different times of the day. Learn how to deal with the harsh midday light, overcast, rain, sunsets, and sunrises. In doing so, you will figure out what minimum equipment you need to cover different scenarios of travel photography.
For example, I realized pretty early on that a minimalistic approach to photography suits me the best, and all I need is a camera with a walk-around lens. For years, I used a combination of a Canon 60D + Sigma 17-70mm and now I have a similar setup of a Sony a6000 + Sony 16-70mm.
Admittedly, I have more equipment in my possession including a wide angle lens (Sony 10-18mm), tripod, filters, and remote triggers. But, if necessary, I can go on an extensive trip and only take a camera and one lens with me.
I am lucky enough to have a beautiful park only a short, walkable distance from where I live. Even now, when I have a new piece of equipment, I always test it there. When I switched from a Canon to a Sony it was a steep learning curve, and the local park was the ideal place for learning about and testing my new equipment.

Park Rene Levesque in Montreal is my testing ground
The next step is to go on a day-long trip to a location within about 1-2 hours drive. In my case, I know all the national and provincial parks around Montreal and most of them make perfect destinations for short photo trips.
This trip will take you away from the comfort of your home for the entire day, and will allow you to start micro planning and testing your skills.
Make sure you plan in advance what spot to visit at sunset or sunrise. It is not always easy to do both during a short trip, so choose only one and make sure you visit the best spot. Use Google search, Google maps, and 500px to pinpoint the perfect location for your sunrise or sunset shoot.
Also, you have to decide how many camera batteries to bring with you, if you need spare memory cards, and so on. If your trip involves challenging hiking, it also might be a good idea to leave the tripod at home.
These trips are designed for photographers to make mistakes and learn. With every new trip, you will learn more about planning, your equipment, and your habits.
When you’re comfortable with the short trips, it is time to graduate to multi-day trips.

Mont-Saint-Bruno national park is only 30km from Montreal
This is how real travel photography started for me.
Montreal is located about 5-7 hours drive from New York, Boston, and Toronto with Niagara Falls. My trips dedicated exclusively to photography started with 2-3 day driving trips to those destinations.
Multi-days trips require much more planning where you should always do your research first and then plan all your sunrises, sunsets and everything in between.
Another new challenge you have to face on these trips is to figure out how to deal with editing and backups.
I am not giving you a specific scenario to follow because, based on my experience, travel routines are always changing and evolving.
For example, in the beginning, I always did some basic edits of my new photos by the end of every day of the trip; now, I only concentrate on my shooting and I start the editing process when I am back at home. But I always have the option to edit photos simply by connecting my tablet to my camera using Wi-Fi, grabbing a few photos, editing them with Snapseed, and posting them to social media.
At the same time, my backup routine has not changed a lot. By the end of the day, I backup all new photos to two external hard drives and always make sure to keep them in two separate places. I have one with me at all times in my bag and the second I keep in the safe in the hotel or in the trunk of my car.
Also, I do not rush to format my memory cards. I keep photos on the cards until I run out of space on all four of them and only then do I start formatting.
The beauty of driving trips is that you do not have to be too selective about the equipment you bring with you. You can load your trunk with everything you own and figure out what pieces are essential for your style of photography later.

New York. Taken during a sunset cruise along the East River.
The next step is to hack your family vacation.
You have to be careful with this one so as to ensure you do not agitate your loved ones or ruin the vacation for them.
A family trip can serve as the perfect opportunity for testing your air travel routines. It requires additional research to figure out carry on allowances on every leg of your trip and decide what equipment to bring.
After I brought all my equipment on one of my first family trips to Cuba and hardly used any of it, I started to pack differently by bringing only the necessities along. Also, after I switched from DSLR to Mirrorless, I can pack everything (almost everything) in my carry on without worrying about lost luggage.

Cuba. Sunrise at Cayo Coco beach.
So how do you start planning?
Begin by planning your vacation as you normally would and concentrate on family activities first. When these are done and everybody is happy, you can enhance your trip with photography adventures.
During the vacation, the only time when you can be 100% dedicated to your photography is when everybody is sleeping. On each day of vacation, you will have a few hours between sunrise and breakfast to concentrate on your photography. And, not only will your family be in bed at 5am, so will about 99.9% of tourists.
In fact, you would be surprised how beautiful Venice looks at sunrise—it is completely different and calm without the chaos of crowds.
Last year, my wife and I went to Niagara Falls in the middle of summer on a weekend getaway. It was so crowded during the day that I had no chance of using a tripod. It was even difficult to take any pictures without having people in the frame. But, when I went to the Falls the next morning just before sunrise, I had the entire place to myself. The only person I met there was another photographer who had the same idea.

The key to successfully combining a family vacation with photography and enjoying them both is to plan every single sunrise in advance. The rest of the days will be dedicated to family activities, and are much more difficult to plan around. You can enjoy your family while trying to be as opportunistic as possible with your photography.
After you have completed dozens of one-day local trips, half a dozen short driving trips, and at least a couple of family vacations, you will be ready to go on extensive trips dedicated exclusively to photography.
You will have acquired the necessary skills and established the personal routines that will help you be comfortable, confident, and safe during your travels.
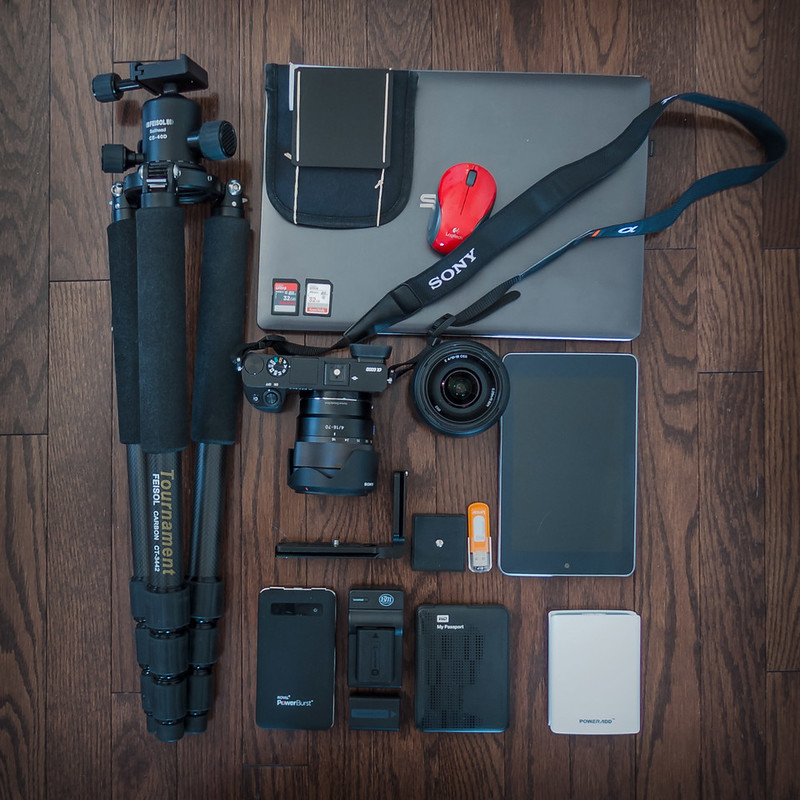
Check what’s in my camera bag…
Learning any new complex process requires breaking it down into smaller digestible chunks that you can then start to tackle one at a time. Travel photography is no different. You cannot learn everything in one shot. By starting small, you will gradually accumulate knowledge, experience, and establish your unique routines.
I hope my simple blueprint will help you fulfill your dream of becoming a travel photographer and accelerate the learning process.
You Might Also Like These Articles:
The post [Travel Photography] A Beginner’s Guide to Learning Travel Photography appeared first on 500px.
Colorado News


