Leading lines are a vital composition tool that photographers use to guide the viewer’s eye through an image, enhancing both narrative and depth. These lines create a visual path that can tell a story, add emphasis, or connect elements within a frame. Here’s an advanced guide on how to harness the power of leading lines to elevate your photography.
Understanding leading lines
Leading lines are essentially any lines—real or implied—that direct the viewer’s attention to specific areas within a photograph. They can be straight or curved, and vary in visibility depending on the scene. The main goal is to create a path that naturally draws the eye from one point to another.

Types of leading lines
Horizontal lines: Typically convey a sense of tranquility and stability. Examples include horizons, coastlines, and rows of trees. When placed strategically, horizontal lines lead the viewer’s eye across the frame, often working in tandem with the rule of thirds to maintain visual interest.

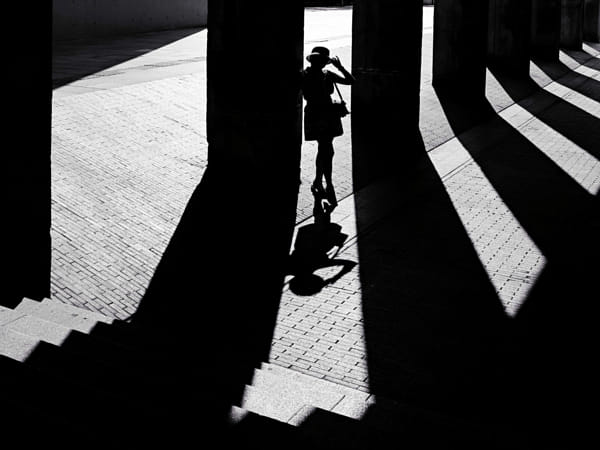
Vertical lines: Give a sense of height, strength, or dominance. They’re perfect for emphasizing the scale of tall buildings, trees, or pillars. Position them to draw attention from the foreground up into the background, creating a sense of grandeur.
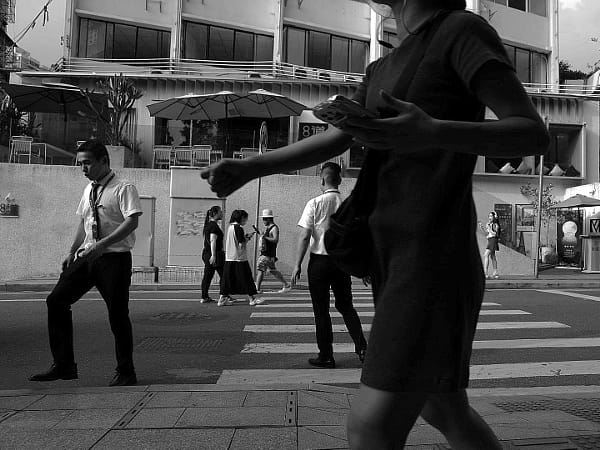
Diagonal lines: Add dynamism and energy to your composition. They can suggest movement and imply depth, effectively pulling the viewer into the frame. Diagonal lines work exceptionally well in urban and street photography, such as roads converging toward a focal point.

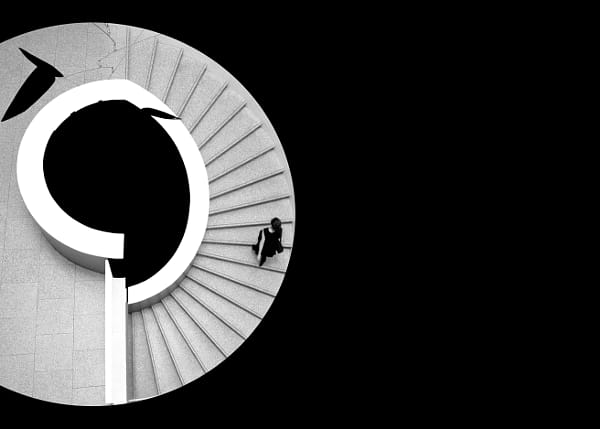
Curved lines: Create a more relaxed and harmonious path, gently guiding the eye through the scene. They are effective in nature photography, such as winding rivers or paths, leading the viewer on a visual journey.
Applying leading lines to your photography
Find natural or man-made lines: Train your eye to recognize leading lines in both natural and urban environments. Natural leading lines include rivers, mountain ridges, and tree branches, while man-made lines encompass roads, bridges, railways, and architectural features.
Guide toward the focal point: Make sure your lines lead directly to your subject or focal point. For portraits, the lines could guide the viewer to a person’s face, while in landscape photography, they might converge toward a distant mountain or sunset.

Combine with other composition rules: Complement your leading lines with other composition techniques, like the rule of thirds or framing within a frame. For instance, diagonal lines leading to a subject placed at an intersection of thirds can create a compelling and engaging composition.
Experiment with perspective: Adjust your camera angle to enhance or emphasize the lines. A low viewpoint can exaggerate the convergence of lines, while a high viewpoint can reveal hidden leading paths.

Advanced tips and techniques
Multiple leading lines: Don’t shy away from using multiple leading lines in a single frame. Parallel lines, for example, can emphasize vastness or create a sense of rhythm and harmony.
Contrasting elements: Add contrasting elements at the end of the leading line to increase visual impact, such as a brightly colored object in an otherwise muted environment.
Curved lines for depth: Use curved lines to lead the viewer into different layers of the image, giving a sense of depth and perspective.
Mastering leading lines allows photographers to create compelling narratives that pull viewers into the image. By carefully guiding the eye through the frame, you can direct attention to key elements, establish relationships, and create a powerful sense of story and dimension. Experiment with various types and applications of leading lines, and don’t be afraid to break the rules for a creative twist. The visual journey you lead your audience on will leave a lasting impact.
Not on 500px yet? Sign up here to explore more impactful photography.
The post Leading lines: Guiding the viewer’s eye appeared first on 500px.
[NDN/ccn/comedia Links]