Getting Started
To begin with in water drop photography you don’t need a lot of equipment. Before you spend hundreds of dollars on something you think you would like to do, and a certain machine is the magic solution to get perfect water drops, try it out to see if this is for you. I have seen many people spend a lot of money on electronics and only see a few pictures from their efforts before they decide this isn’t working for them. The fancy drops you see on the internet are achieved with lots of experience, testing and skill and there is a long process to get the ultimate water drops.
I started out using a medicine dropper for the first year and for the first few months used only my in-camera flash. I already had a true macro lens which was a bonus! Ultimately, you would need at least a 100mm macro lens, a DSLR camera, external flash guns, (I use three) and electronics. I use Mumford’s Time Machine and Drip Kit which was still in a testing phase when I started with this, but there are several different timing rigs available. Do some research and decide what you want to achieve with the outcome of the drops.

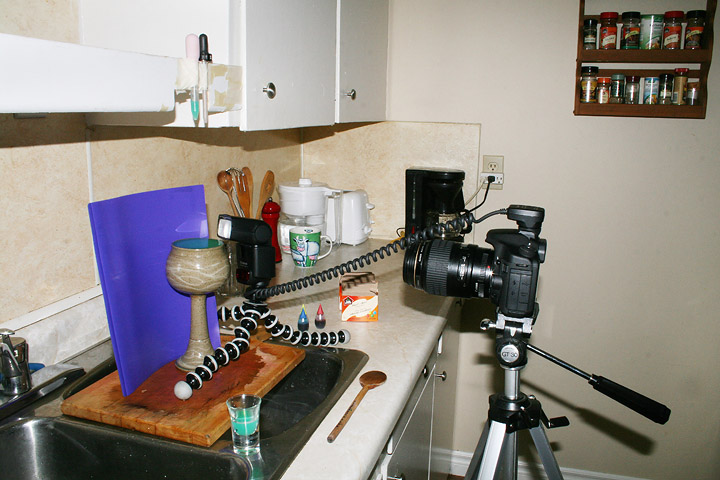
Setup 1 – A medicine dropper and one external flash.
Some of my own favorites water drop photographs are still those done manually with only a medicine dropper and one external flash…
Sea Flower by Corrie White on 500px
Kung Fu Fighting by Corrie White on 500px
Cherry on Top by Corrie White on 500px
Containers
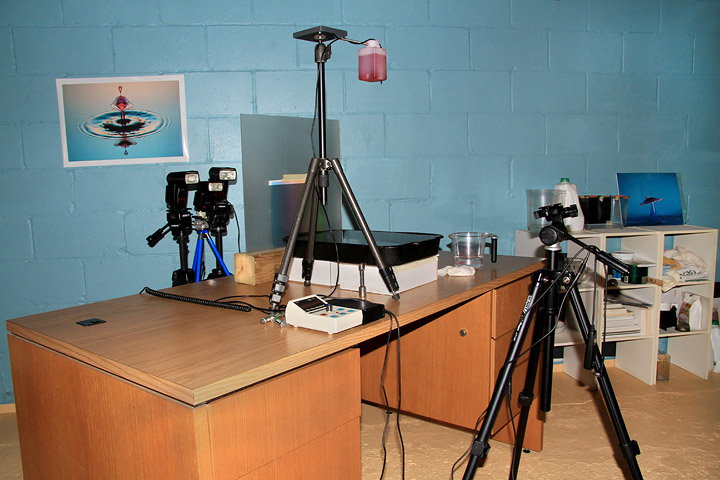
You can use various containers for splashes in your water drop photography. I mainly use a black water tray which measures 41cm x 28cm x 5.5cm deep. The height of the valve from the water is 48cm but this varies greatly each time I do a session. I use black plastic in the bottom of my tray to help get clear reflections.

Setup 2 – The basic water set up that I use at the moment. The camera is at an angle low enough to catch a reflection without showing the front and back of the water tray.
The Process to great water drop photography
On the Time Machine I set the number of drops (I always use 2 for all of my images), the interval between the drops, the size of the drop and the flash lag to catch the drop in a desired stage. I then activate the shutter button which opens the shutter on my camera, drops two drops in succession, fires the flashes and then the shutter closes.
I usually have my exposure set to 0.05 seconds; this is necessary to allow time for the process. It is the speed of the flashes that freezes the action, not the shutter speed. The flashes fire at approximately 1/20,000 – 1/30,000th of a second. The drops are done in a very dimly lit room to avoid ambient light so only what the flashes capture will show on camera.
Tea With Milk by Corrie White on 500px
Liquids
I use mainly water and milk. With the water you can use additives such as glycerine, dissolved sugar or guar gum. Glycerine and sugar will leave the water a bit cloudy but guar gum is excellent for thickening the water. You can buy it at a bulk food store. Use about 1/8th teaspoon in 2 cups of warm water, mix well and strain with a coffee filter a few times. It is lumpy and hard to strain. I mostly use xanthan gum which is similar to guar gum, but you need less and it is easier to strain.
I love working with milk. I usually use skim milk and sometimes add a few drops of cream to thicken. The fat content of milk makes it easy to get nicely formed shapes. Using milk as a base in the drip tray is great for effects, but soon the milk gets cloudy so I use water as the base liquid in the tray.
Lighting for your water drop photography
Lighting is very important in photography. Too little and you get noise. Too much and it’s blown out. My most common settings are an ISO of 100 – 200, an exposure of 0.05 seconds to allow for the whole process, and an aperture (usually) of f/14 which gets me enough light and depth of field.
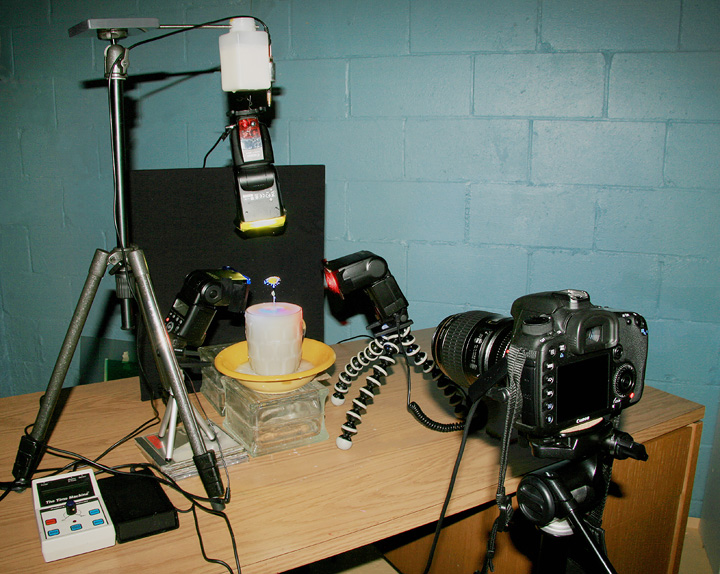
For water drops, I often have the three flash guns behind a pane of acid-etched glass for soft diffusion of light. For the milk drops, I have the flash guns situated on either side of the drop and sometimes above.

Setup 3. This one is basically how I shot Jaws. I use this for a lot of my colored milk drops such as Black Hole and My Daffodil. My crowns are also shot this way, except I use black glass for the base.
Stages of a Crown by Corrie White on 500px
Using colors in water drop photography
The colors in the drops are usually from food dye. Background colors come from various plastic gels on the flashes or else from colored overhead transparencies which I design and get printed. Lately I will sometimes color milk with a bit of yellow food dye and have colored gels on the flashes to get the multi colored drops.
There are so many shapes you can get with water drops. No two are alike. Liquids have a mind of their own and you have to take this into consideration. As one of my colleagues said, “It’s an art, not math.” Some of us push the limits with electronics, and you see some technically fantastic creations, but I always come back to the basic mushroom shape which is still one of my favorite shapes.

Setup 4. The setup I use for my liquid flow images and also the ones where the mushroom type drop is on top of the surface, with the delayed flash on the flow underneath. You can see I need both hands so I use the shutter button as a foot pedal.
Water World by Corrie White on 500px
Mushrooms & Jellyfish by Corrie White on 500px
Eclectic Dreams by Corrie White on 500px
Patience, perseverance and persistence are essentials for a water drop photographer. Creativity is also necessary. Make your pictures aesthetically appealing. Be unique. Stand out. Once you get inspiration from other photographers, innovate rather than imitate. We all imitate to get started, but then make it your own.
Thanks to Corrie for showing us how to capture water droplets! If you’d like to see more of Corrie’s work head over to her 500px page or her website Liquid Drop Art.
You Might Also Like These Articles:
- How To Create And Photograph Colorful Figures With Water Drops
- Behind The Photo: Using Water Droplets To Create An Intriguing Portrait
- Night Photography: How To Photograph The Night Sky
- [Portrait Photography] Shoot Dreamy Backlit Portraits With Natural Light
The post How To Get Started in Water Drop Photography appeared first on 500px.
[NDN/ccn/comedia Links]


No comments:
Post a Comment